The guitar is one of the easiest and most satisfying instruments to learn. Guitars are also very accessible – there’s a guitar for every budget, from wallet-friendly beginner acoustic guitars to pro-level electric guitars under $1000. You can even get a travel-size guitar so you can bring it along wherever you go. If you’ve always wanted to play the guitar, there’s really nothing stopping you from doing so!
As a beginner, one of the first things you need to learn is how to play guitar chords. In this article, we’ve laid out the most basic guitar chords to help get you into the groove of playing. Learning these simple beginner guitar chords can already let you play some of the world’s most popular songs.
When three or more different notes are combined to create a sound, that’s called a chord. The notes of a chord are often played at the same time, but they can also be played one after another in an ascending or descending order. Beginners usually start with playing the notes simultaneously before progressing to playing the notes in succession in what is called an arpeggio.
Being able to play familiar tunes with just a few chords is a big motivator. The more you practice, the more you’ll look forward to learning some more chords so you can play all the songs you want, compose your own songs and ultimately become the musician you’ve always wanted to be.
Before we go into the guitar chords for beginners, we’ll first have a quick discussion about the guitar strings and the guitar chord diagram. These will help in making learning to play the basic chords a whole lot easier. Then, we’ll dive right into our beginner chords. Take all the time you need to get these chords down, and practice, practice, practice!
To help you along, we’ve also included some useful tips for memorization, practice and guitar playing in general. Of course, this lesson won’t be complete without a list of the guitar songs you can play using the chords you’ve just learned. We’ve selected some of our all-time favorites from classic rock to contemporary pop music – take your pick or play them all!
If you want to learn the guitar, then check out our review of online guitar lessons.
All set? Let’s get started!

Contents
- Guitar String Names
- Guitar Fundamentals: Getting to Know the Guitar Chord Diagram
- Basic guitar chords for beginners and how to play them
- Guitar chord memorization technique
- Em guitar chord (E minor chord)
- E guitar chord (E major chord)
- C guitar chord (C major chord)
- Cmaj7 guitar chord (C major 7)
- G guitar chord (G major chord)
- D guitar chord (D major chord)
- Am guitar chord (A minor chord)
- A guitar chord (A major chord)
- Fmaj7 guitar chord (F major 7 chord)
- Fm7 guitar chord (F minor 7 chord)
- Guitar playing tips for beginners
- Easy practice songs for beginners
Guitar String Names
The most common guitars you see today have six strings and have a standard tuning of E-A-D-G-B-E. The sixth string is the thickest one and is often referred to as the low E string. The fifth string is the A string, the fourth string is the D string, the third is the G string, the second string is called the B string and the first string, the thinnest one, is the high E string.
When you’re holding your guitar, the sixth or low E string is the topmost string, the one closest to your head. The first or the high E string is the one at the bottom, closest to your legs. It can seem confusing and counterintuitive at first but you’ll get used to it. Starting from the topmost string, just count downward: 6, 5, 4, 3, 2, 1. E, A, D, G, B, E.
Remembering string names can be tricky, so it’s often suggested to create memorable, often quirky phrases where the first letter of each word stands for each guitar string. One popular example is “Eat All Day Get Big Easy” for E-A-D-G-B-E. If this is reversed to E-B-G-D-A-E (starting from the first string), you can use the phrase “Easter Bunnies Get Dizzy At Easter” or come up with your own! This will make the string names really stick.
Guitar Fundamentals: Getting to Know the Guitar Chord Diagram
A guitar chord chart or chord diagram is a visual representation of the guitar fretboard and how a chord should be played on it. At first look, you may feel confused with all the lines, numbers and dots, but chord charts are helpful in instructing you how and where to make a specific chord.
Because guitar chord diagrams are graphics-based rather than text-based, it makes knowing how to make a particular chord faster. Using chord diagrams (also called chordboxes), you’ll be able to know how to play a certain chord at a glance – you only need to learn how to read them.
Chord diagrams are often placed at the top of a music sheet for easier reference. Songwriters also put chord diagrams into their work to specify a particular shape to be played for a certain chord.
So what do all those lines, dots and numbers mean?
The topmost horizontal bar on a guitar chord diagram represents the nut of the guitar. The line is usually thicker or composed of two lines. The nut is the part of the guitar that separates the fretboard from the headstock and elevates the strings over the fretboard (also called the fingerboard).
The rows of boxes that follow this horizontal bar represent the different frets on the guitar. The thinner horizontal lines represent the metal fret bars. The first row of boxes stands for the first fret, the second represents the second fret and so on.
Chord diagrams typically show three or four frets. For chords that are made past the fourth fret, the top horizontal bar (representing the nut) will not be seen. Instead, you will see a number on the left or right side of the diagram. This number indicates the fret number where the chord is made.
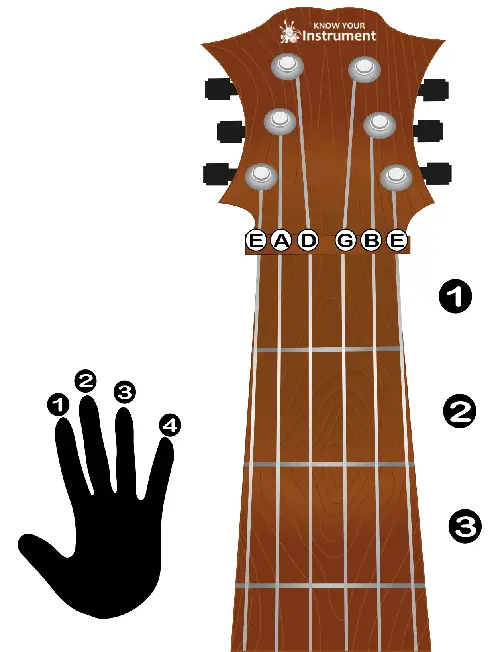
Now let’s move on to the vertical lines on the guitar chord diagram. These ones represent the strings on the guitar, so there are six. The leftmost vertical line represents the sixth or the low E string; the one at the rightmost represents the first or (high E string. 6-5-4-3-2-1, E-A-D-G-B-E, easy peasy!
To make it easier for you to understand all of these, hold your guitar so that its headstock points directly up, just for a moment. You’ve now got the nut, frets and strings looking exactly as they are on the diagram.
The dots in the diagram indicate where to place your fingers when you fret. As you may observe, the dots are placed over the vertical lines representing the strings. A dot on a string means this string should be fretted, or pressed down onto the fretboard.
There are numbers below the diagram or on the dots themselves as in our case – these numbers indicate which fingers to use to fret notes and make the shape of the chord. Each finger is assigned a number: “1” is for your index finger, “2” for the middle finger, “3” for the ring finger and “4” for your pinky or little finger. Sometimes, you will see the letter “T” instead of a number. This means that you will use your thumb for fretting that particular note.
Along with the finger numbers at the top or below the diagram, you might also see X’s. The X means the string should be muted (you don’t play that particular string at all). Muting a string can be done by lightly touching it with one or more fingers without pushing it down to the fretboard. We have also faded the string out to make this clearer. On some diagrams (not ours), you might also see O’s meaning you should play that string open (in other words, don’t fret it).
Chord diagrams also show how to play barre chords, in which one finger is used to fret notes at the same time. Barre chords are represented by a solid or curved line going through a fret and over multiple strings starting from the first chord note to the last. A series of black dots with the same finger number is also used to represent a barre chord.
Chord diagrams also indicate if a particular chord is a minor chord using a lowercase m. A chord labeled as “Em” is an E minor chord. If there is no lowercase m, it means the chord is a major chord.
When learning to read chord diagrams, it’s perfectly fine to start slow so you can become more comfortable and confident in following them. To help you practice reading chord diagrams and learn to play guitar, it’s time to move on to our main section.
Basic guitar chords for beginners and how to play them
Just how basic are we going to get? Well, while there are many easy guitar chords that require only one or two fingers for fretting, some aren’t really used that often. We feel it’s important to introduce beginners to guitar chords that are not only easy but also useful in playing a multitude of songs. So, for this list of basic guitar chords, we’ve chosen the most commonly used ones. You can then choose to try other chords as you progress and expand your musical taste.
It’s also important to note that some chords have other versions. This means that these can be played using other chord shapes or finger placements. Since we are showing the most beginner-friendly ways to play chords, we’ve included standard versions as well as alternative versions for some of the chords. It’s worthwhile to learn different finger placements especially when you’re learning to transition from one chord to another.
In this guitar chord guide for beginners, we refer to the index finger as “Finger 1,” the middle finger as “Finger 2,” the ring finger as “Finger 3” and the pinky as “Finger 4.” None of these basic chords use the thumb for fretting, so you don’t have to worry about that!
We’re also numbering the frets as Fret 1, Fret 2, Fret 3 and so on. The first fret, Fret 1, is the one that is right next to the nut.
Guitar chord memorization technique
The step-by-step instructions below are for you to learn which fingers to use when fretting and where. When you’ve got it down, remember to push the strings onto the fretboard all at once. But how do you memorize chords and play them smoothly? You’ll need to get your fingers used to making the shape of the chord. Here’s how!
- Fret the strings as instructed or according to the chord diagram. Press the strings down using the tips of your fingers. Bend your knuckles and rest your thumb at the back of the guitar neck.
- Play or strum each fretted string to make sure that all of the notes are sounding.
- Play the chord by strumming all of the strings (except those that are marked with an ‘X’ or the muted strings). Get a good feel of the chord.
- Lift your fingers off the strings simultaneously.
- Push the strings back down to make the chord again. Make sure you retain the shape of the chord.
- Strum your guitar again and listen more closely to the sound of the chord. This can help train your ear and “connect” the sound to the chord shape you’re making.
- Repeat until your fingers develop muscle memory and you can identify the chord by ear.
Let’s get into those beginner guitar chords now!
Em guitar chord (E minor chord)
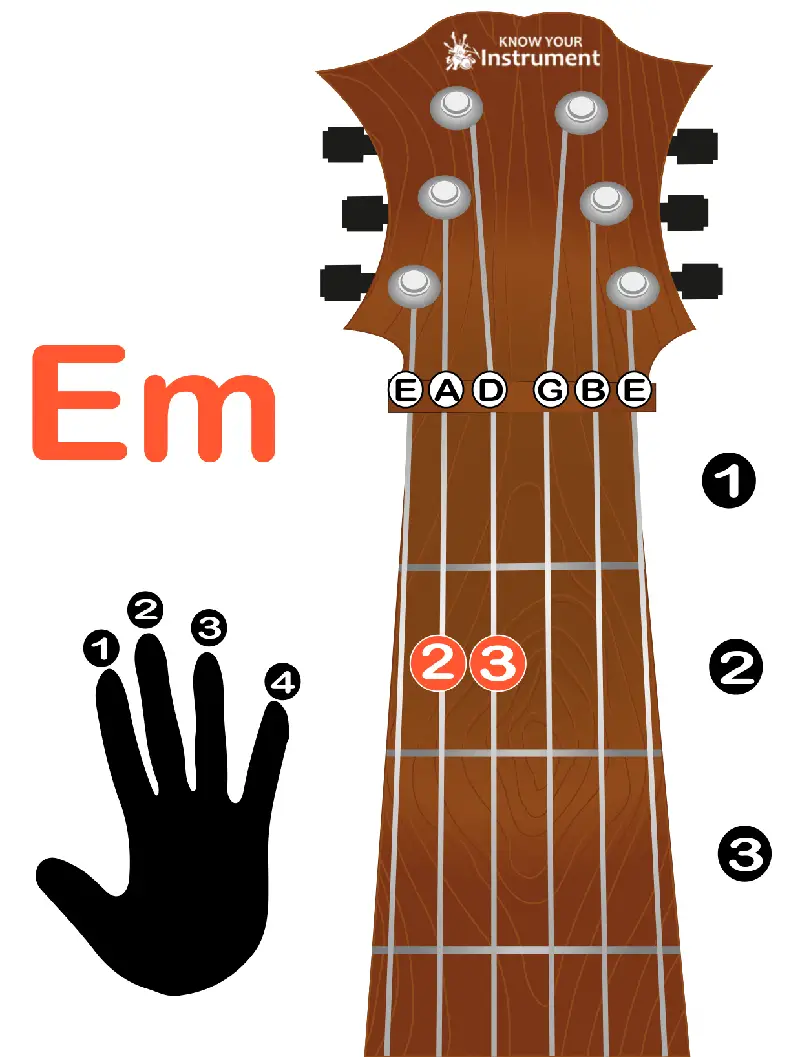
The other strings are played open, so this means you should strum all of the strings.
E guitar chord (E major chord)

Fret 2: Place Finger 2 on the fifth string and Finger 3 on the fourth string.
As with the Em chord, all of the strings are played open.
C guitar chord (C major chord)

Fret 2: Place Finger 2 on the fourth string.
Fret 3: Place Finger 3 on the fifth string.
Mute the sixth string (low E string) – play the rest (first to fifth strings)
Cmaj7 guitar chord (C major 7)
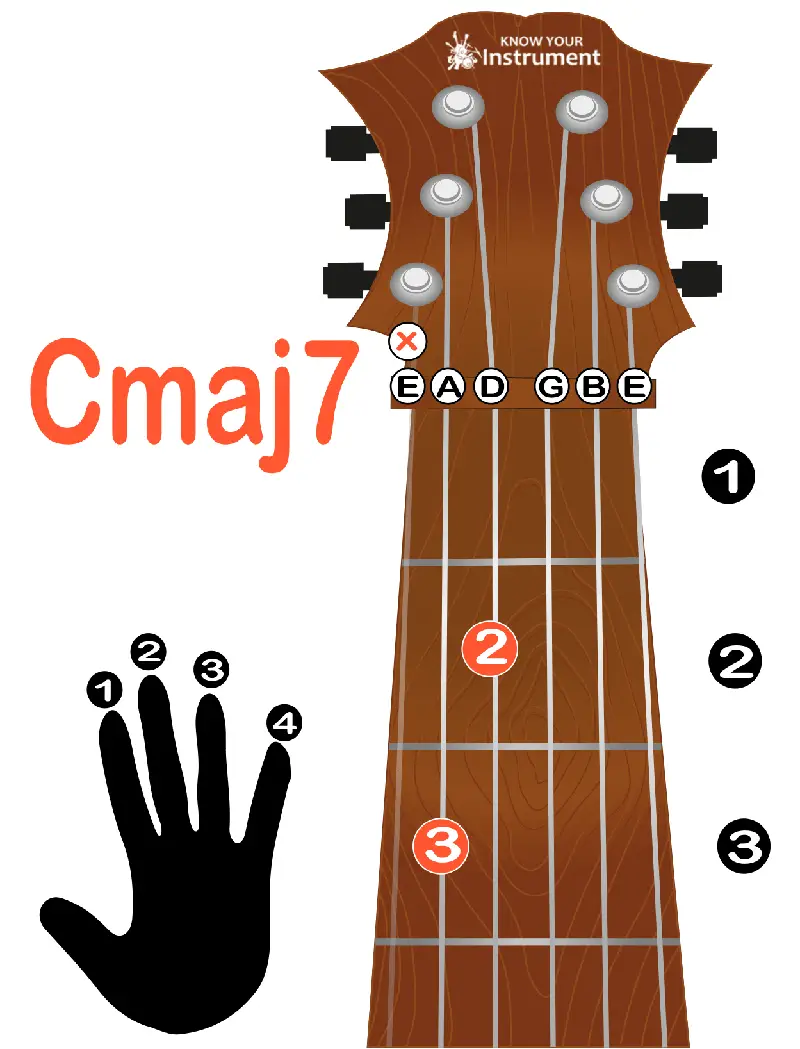
Fret 2: Place Finger 1 on the fourth string.
Fret 3: Place Finger 2 on the fifth string.
As with the standard C chord, skip the sixth string when playing this chord.
G guitar chord (G major chord)

Fret 3: Place Finger 2 on the sixth string (low E string) and Finger 3 on the first string (high E string).
Play all of the strings.This finger placement for the G chord makes the smoothest transition with the standard C chord fingering above. A lot of songs transition from G to C (or C to G), so using this particular fingering is ideal.Another G chord version, this time using just two fingers, transitions well with the Cmaj7 chord. The G6 is played like this:
Fret 2: Place Finger 1 on the fifth string (A string).
Fret 3: Place Finger 2 on the sixth string (low E string).As you can see, you can transition from G6 to Cmaj7 just by moving Fingers 1 and 2 one string each (A string to D string for Finger 1 and low E string to A string for Finger 2).
D guitar chord (D major chord)

Fret 3: Place the tip of Finger 3 on the second string to avoid touching the high E string below.
Don’t play the sixth and fifth strings; play only the fourth to first strings.A two-finger version for the D chord is the Dsus2 chord, which is played like this:
Fret 2: Place Finger 1 on the third string.
Fret 3: Place Finger 3 on the second string.
Play only the fourth to first strings as with the standard D chord.
Am guitar chord (A minor chord)
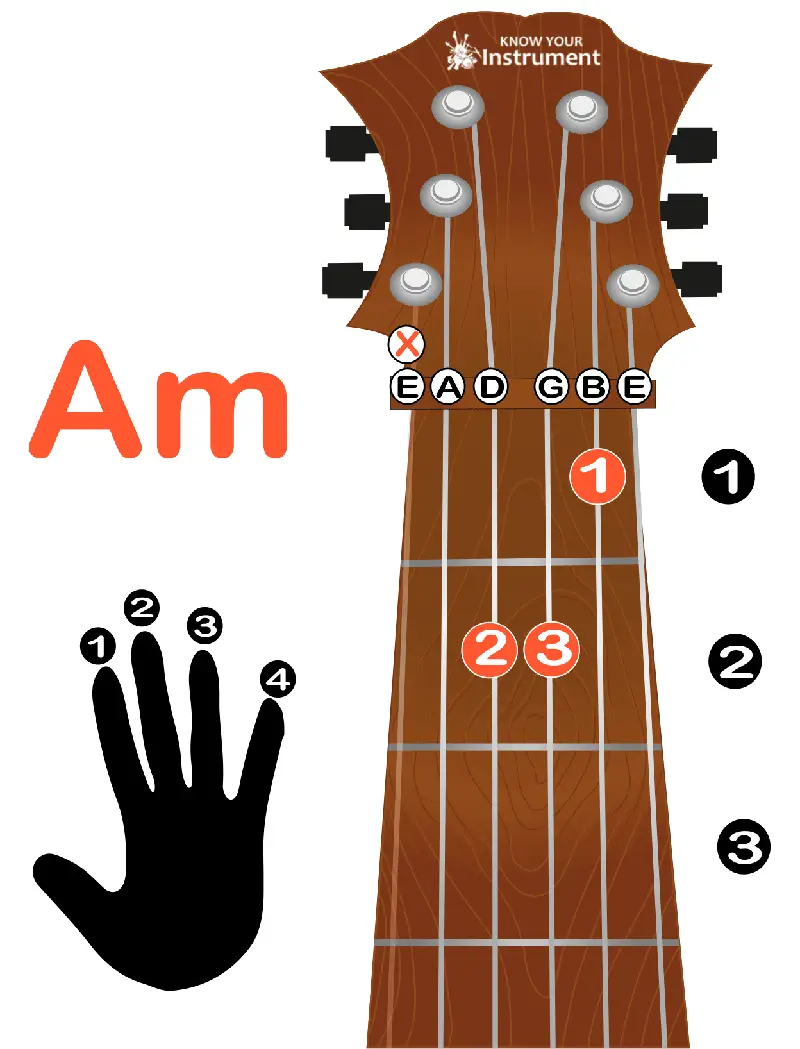
Fret 2: Place Finger 2 on the the fourth string and Finger 3 on the third string.
Play only the first to fifth strings, avoiding the sixth or low E string.An Am version that uses only two fingers is the Am7 (A minor 7). It’s played like this:
Fret 1: Place Finger 1 on the second string.
Fret 2: Place Finger 2 on the fourth string.
Like the Am chord, only the first to fifth strings are played.
A guitar chord (A major chord)

Play only the first to fifth strings.Another version you can try is using Finger 1 to fret the fourth, third and second strings at Fret 2 while muting out the first string with the joint of Finger 1. You’ll need to bend Finger 1 back slightly in order to achieve this. You would also need to mute the sixth string using your thumb. This version requires a bit of practice, but it’s definitely worth a try.
Fmaj7 guitar chord (F major 7 chord)
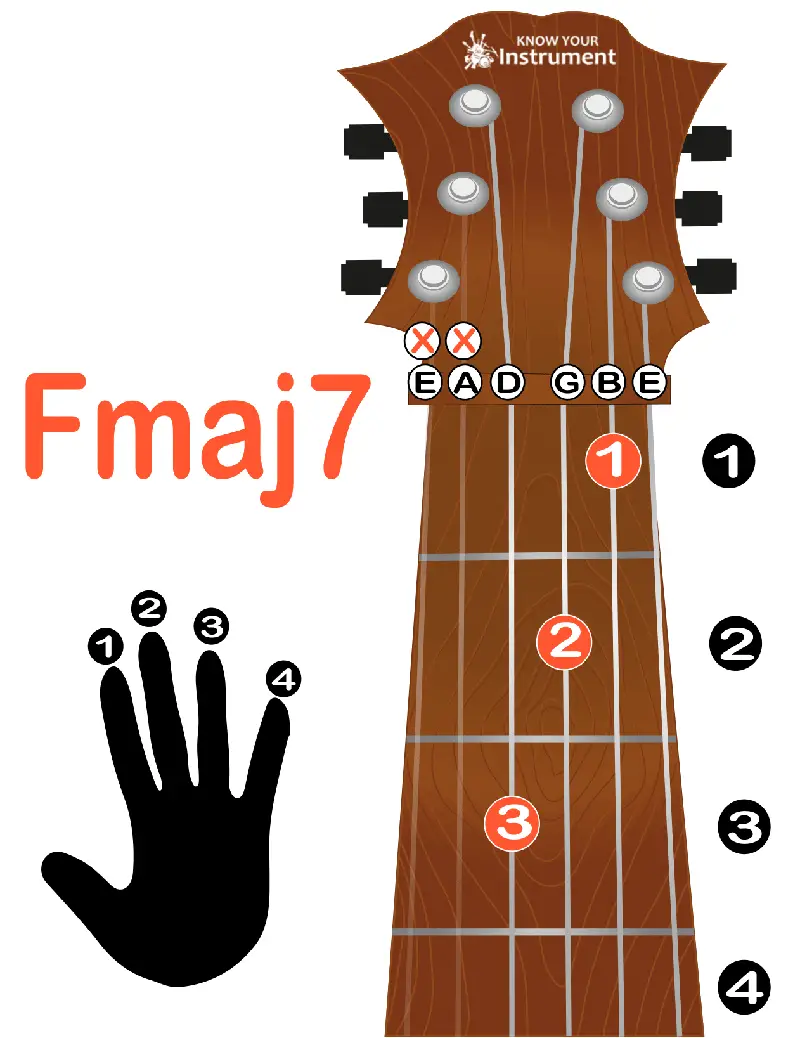
Fret 1: Place Finger 1 on the second string.
Fret 2: Place Finger 2 on the third string.
Fret 3: Place Finger 3 on the fourth string.
Play only the fourth to first strings.
Fm7 guitar chord (F minor 7 chord)
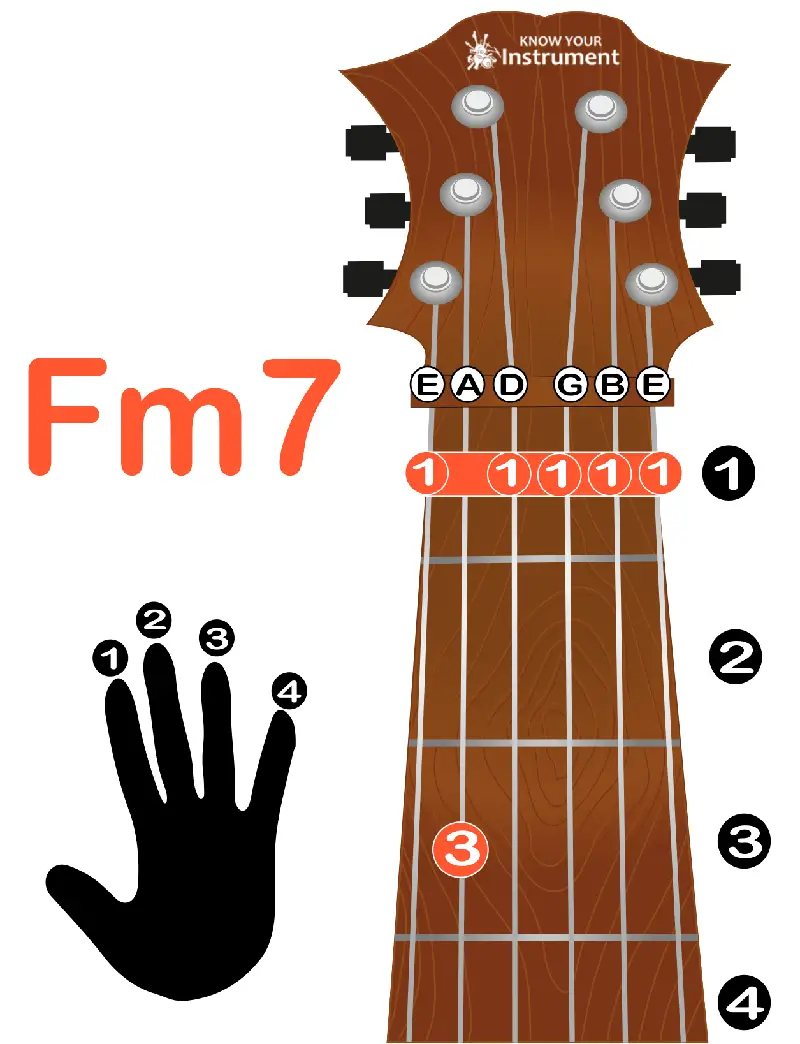
Fret 3: Fret the 5th string with your third finger.
If you find the strings tough to press down because of their proximity to the nut, press down close to the first metal fret marker (not on the marker itself).
Keep practicing these beginner guitar chords and you’ll be able to play a variety of tunes just using these alone. Over time, your muscle memory will take over and you won’t have to check chord diagrams all the time to see if you’ve placed your fingers on the right strings and frets. You will also have a practiced ear and you’ll know if you’ve made a mistake or not. If you did, just try again!
Guitar playing tips for beginners
1, Take it easy
We know how exciting it is to finally learn guitar, but it’s also important to start things slow and not to rush. Memorizing chords, training your ear and developing muscle memory takes time, so have patience.
2. Keep track of your progress
Knowing where you’re at in your training can help motivate you to keep going and challenge yourself to learn the more difficult chords or practice new songs. You can keep a daily practice log and/or record videos of yourself playing. Every few months, make a time-lapse video of your progress!
3. Use a metronome
Practice chord transitions, rhythm and strumming patterns using a metronome. It really helps! Start with a slow speed and increase the tempo gradually as you become more adept at playing. You can choose to use a physical metronome, an online metronome or a downloadable app.
4. Mind your posture and warm your fingers
For you to enjoy playing guitar for as long as you want, you’ll need to make sure your body is up to the challenge. First, you should maintain good form and proper posture whenever you play. This helps you avoid muscle and joint strain. Next, you also need to do some hand and finger warm-ups, which help prepare you for dexterity exercises and long minutes of playing.
5. Hum or sing along
When you play guitar chords for the first time, do your best to hum or sing them back (you can say the name of the chord or the lyrics to a song). Repetition is key to knowing songs by heart. Singing or humming also helps you keep the right timing, which is important when you’re strumming and transitioning between chords. And if you have dreams of becoming a singer-songwriter, then it’s best to practice those vocals whenever possible!
Easy practice songs for beginners
The best way to practice the chords you’ve just learned is to play them in songs. We’ve listed some of the most popular guitar practice songs for beginners below and the chords used in playing them. You can do a search of their guitar tabs and more beginner-friendly songs. Enjoy! For more tips on songs, then make sure you review our beginners’ guide.
Marry You (Bruno Mars) – D, Em, G
Hello (Adele) – Em, G, D, C
Linger (The Cranberries) – A, C, D, G
A Long December (Counting Crows) – A, D, Em, G
Closing Time (Semisonic) – G, D, C, Am
Break On Through (The Doors) – D, Em
Poker Face (Lady Gaga) – C, D, Em, G
Back to December (Taylor Swift) – Am, C, Fmaj7, G
How to Save a Life (The Fray) – G, D, C, Em
Heroes (The Wallflowers) – C, D, G
Breakfast at Tiffany’s (Deep Blue Something) – A, D, G
Mad World (Gary Jules) – Em, G, D, A
Drive (Incubus) – A, C, D, Em
Radioactive (Imagine Dragons) – Am, C, G, D
Love the Way You Lie (Rihanna) – C, D, Em, G
We hope our guide to the basic guitar chords for beginners helps you on your musical journey. Remember, the more you practice, the better you will become as a guitar player. Start slow, practice consistently and most of all, have fun playing!


